Settings
The following chapter describes the different settings that are available for the TimePunch Watcher.
Recording Settings
Via the menu “Time tracking settings” of the TimePunch Watcher one can get to the page where the user can adjust the manner how TimePunch is recording times.
After choosing the menu item the following page will be opened.

Time Recording starts directly when the watcher gets launched and it stops recording automatically when the watcher gets closed.
If this option is set, the time recording will be started directly after logging on to the PC. In that case the project of the previous day will be used. Additionally this option also stops the time recording when the TimePunch Watcher will be closed.
**
**
Recording Mode
TimePunch can be used in three different recording modes.

Full fledged time recording with break time mode

Using this mode the user can start or change a project and one can stop the project or take a break.
Simplified start/stop time recording

With the simplified start/stop time recording, the user can change the project or restart and stop recording. A break time can be taken by stopping and restarting the recording time.
Automatic time recording and just project selection

In the simplest recording mode, the user can only select new projects and start them. It’s no longer allowed to insert a manual pause or stop the recording. But automatic breaks are still getting recorded (for example, if the screen saver is activated). This setting prevents even accidental recording gaps by stopping the time recording.
**
**
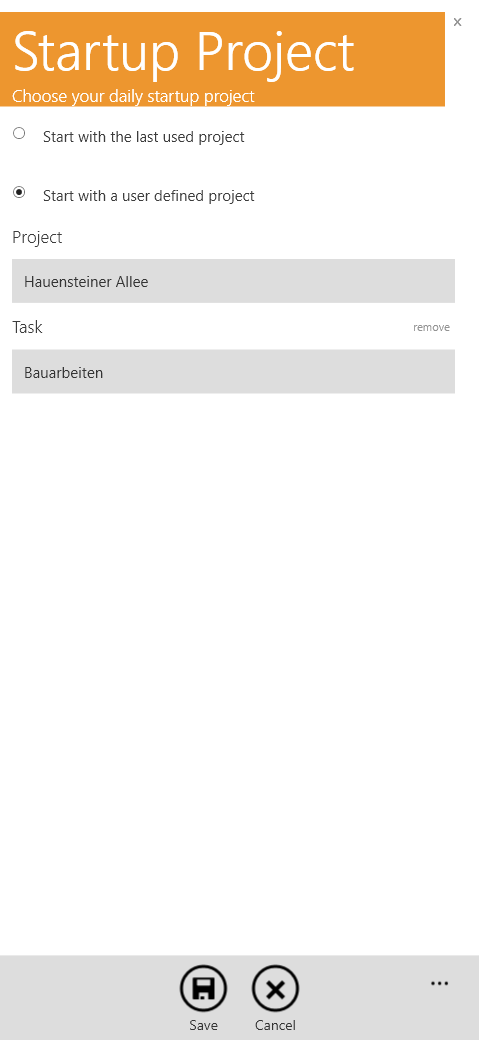
Setting up the start-project
With this option the start project in the TimePunch Watcher can be set up. The start-project defines which project/task combination will be used to start the very first time-recording of the day.
The start project can be evaluated dynamically by the most recently used project, or can be set up with a user defined project/task combination.
Recording precision
This setting defines how the start and end time of a recording gets rounded. As a default there’s a 1 minute rounding in place. But in many other companies it might be more useful to set the recording precision to e.g. 5 minutes. But that depends where you are working.
Remind for project update
Using that option TimePunch will remind you to check the time recording from time to time. When there’s a lot of buzz in the office, it might be useful that TimePunch shows itself in order to remind you to validate the project you are working on.
**
**
After locking Windows
With this setting one can define how TimePunch reacts when Windows will be locked. The following possibilities can be chosen:
- Pause time recording
After locking Windows a break time recording will instantly started. After the break TimePunch will continue recording the previous project. - Ignore 5 to 30 minutes of absense
If that option has been chosen, TimePunch carries on until the defined time span has been reached. If the PC is still locked, the complete time starting from locking Windows until signing in again will be tracked as break time. If the staff logs on before the time span has been reached, then no break time at all will be recorded. - Don’t pause time recording at all
Even if the PC is locked, TimePunch will record that time as work time. Only if the staff manually paused the recording or switched it off, a break time will be recorded.
But it doesn’t matter which settings has been chosen: If the locking time exceeds 6 hours, the time recording will be closed with the locking time as the end time.
Note: Also the screen saver can lock the PC. Using this setting it can be achieved that an activated screen saver automatically triggers a new break time entry if the break time limit exceeds.
Display Settings
Using the menu „Display Settings“ a page will be shown, where to choose how the TimePunch Watcher looks like and how to use it
After choosing the menu item the following page will be shown.
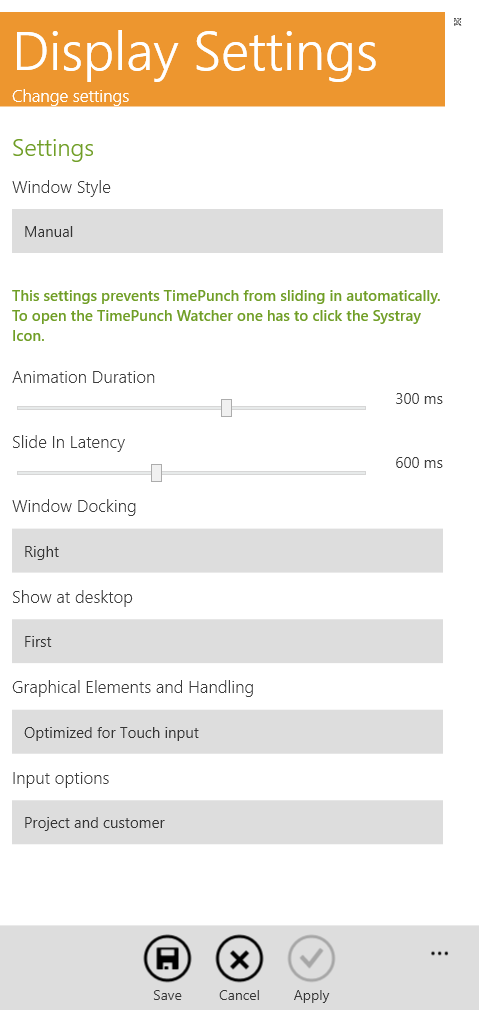
Window Style
The Window Style defines how the main window of the TimePunch Watcher behaves. There you’ll have the following possibilities to choose from.
- Hidden
In that mode the TimePunch Watcher gets collapsed completely. Only if the mouse gets moved to the border of the monitor and stays still for the defined latency time, the window will be moved into the screen back again. The window will be closed again, if the user clicks with the mouse to another position than the TimePunch Watcher. - Touch friendly
In that mode the window won’t be collapsed completely, but stays about 5mm visible at the border of the screen. That’s enough to tap to the window in order to activate it again. - Visible
If that settings is active, TimePunch stays always visible at the screen. This is always useful, if TimePunch can stay at a second or third monitor on a defined place. - Manual
If the manual settings has been chosen TimePunch won’t open automatically. In order to open the Window the user has to click to the TimePunch Icon at the system tray. - Invisible
Using this setting the TimePunch Watcher won’t be shown at all. Only if the TimePunch Watcher gets started twice using the start menu of windows will show the TimePunch Watcher again Hint: This setting only makes sense in combination with the recording setting “Time Recording starts directly when the watcher gets launched and it stops recording automatically when the watcher gets closed.” Because with this setting the TimePunch Watcher will record the daily working time automatically and without showing the TimePunch Watcher to the user.
TimePunch Watcher Icon
Using that setting it can be defined, if and when the Icon of the TimePunch Watcher will be shown.
- Show TimePunch Watcher in Task Bar
The TimePunch Watcher will be shown with all other opened software in the task bar of Windows. - Show TimePunch Watcher in System Tray
With that setting the TimePunch Watcher will be shown in the system tray of windows. A click to the icon will open the TimePunch Watcher itself. - Don’t show the TimePunch Watcher Icon at all
Using that setting the TimePunch Watcher won’t be shown as an icon; neither in the task bar nor in the system tray of windows.
**
**
Window Docking & Show at desktop
Using the settings for the window docking and the desktop, one can define where the TimePunch Watcher stays at the screen.
Control of the UI elements
With this option, one can set whether control elements such as the date, the time, or the timespan selection is optimized for touch screen operation.
Input options
At this place one can select which data to show up for the time recording at the stopwatch. Tip: To keep it simple, just let display the fields that are often required. All other data can be amended subsequently for the time entry in the entry dialog.